


Super Solder inlay for wood in woodworking projects
Woodworking tips: learn how to make solder inlay in your woodworking projects using solder and a soldering iron, I used the Inventables X Carve CNC to carve Superman’s logo you can also use hand tools or a Dremel tool to carve and shape for this woodworking technique.


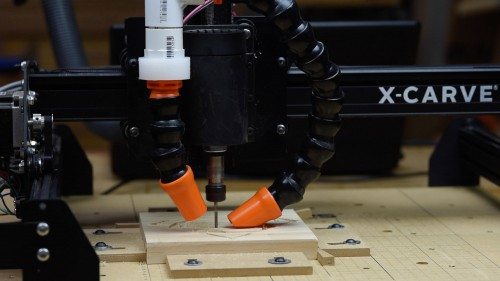
X Carve CNC from Inventables
1/ I used the X Carve CNC from Inventables to carve out a design to about 3mm deep, but you can use any sort of carving or boring tool like a Dremel, Drill Press, Router Table, Table Saw, Chisel, Scroll Saw etc.
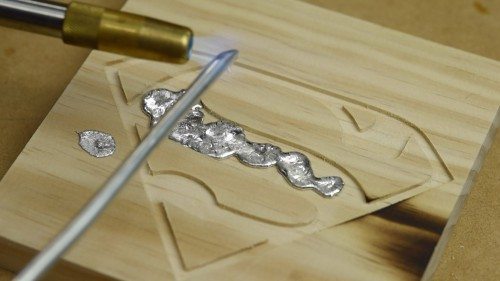
Melting solder for inlay in woodworking projects
2/ I used solid solder that is used in plumbing and using a blow torch melted it over the carving, I found clumping it together worked better as each drip would merge with the one next to it, keep going until you fill the mold with solder.

Sanding solder inlay
3/ Using a belt sander to sand down the excess solder it did a pretty good job of quickly removing material, you can finish it off with a random orbit sander and some hand sanding to give it a bit of a polished look.

Woodworking using solder inlay
4/ I used a blowtorch to burn the wood around the Superman logo which looked pretty cool, you could also stain the wood if needed. I then used Minwax wipe on poly to finish it off.
Pingback: How to Create an Easy Inlay in Wood with Solder | Make:
Nice trick! I have used brass powder and the trimmings from a key cutting machine on wood turnings, held in place with CA glue. Your technique would look good on a dark wood, like walnut.
That would look pretty cool, i have seen people turn things like that as well on a lathe.
Pretty cool idea can I ask do you use any glue for the solder to adhere to the wood??….I’ve never used solder for that purpose and it would seem to me that it would just drop out??
Best wishes
Alan
Hi Alan, no glue is needed it seems to stick pretty well to the wood, you can also rough up the bottom of the hole and undercut around the bottom edge to help it bite in.
Great Idea!! Plumbing solder now a days has silver in it. Silver polishes great. I laser engrave on my pieces and this idea opened another avenue for me.
Thats great feel free to post any pictures of it on my Facebook page.
I gave this a whirl and failed pretty bad so far. The solder just seems to ball up and not spread out. It also doesn’t stick to the wood. I’m using aspen. Solder won’t stick even when I try to smash down. Any thoughts on what might be going wrong here?
Hi Dave, sorry for the delay i missed your message. you can try undercutting the edge of the whole to give it something to bite into. Are you using solder with no resin core the resin core might stop it sticking i think. Try solid solder like they use for plumbing.
I do a lot of scroll work and would like to try this idea in conjunction with some of my more delicate pieces. I do not however want to burn the wood for a finish.
Woods I use generally are walnut, maple, oak, and cherry. Every now and then I will use more exotic woods like Sapele, Paduck, etc.
As you can guess, my work is on the delicate side and at the price of wood these days …. I hate to ruin a piece before it’s finished.
Any thoughts on a different process?
That looks great, I often incorporate metal with wood, but your method gives me countless options, once again,great job.
good to hear thanks
Use a scalpel to scratch the bottom of the inlay at a 45 degree Angel should help the solder bite.
That helps for sure
Q: I am doing a bread board island countertop with maple and African mahogany, between the boards I have some gaps where the maple tweaked and I want to fill them and some cracks with the solder. Looking at Oatey 29025 Safe Flo 0.117-Inch ga. Bulk, Silver, 1 lb. for the job. Do you use any flux or just melt the solder without it? This is a plumbing solder as you recommended above, the top will be sealed with an epoxy.
I used solder with no flux, people that used flux seemed to have problems.
Hi, I played around with this idea many years ago, filling natural cracks in timber from jewelry to table tops as an alternative to using resins and the like. Undercutting the base edge of cutout is a great way to lock the solder in, especially if the area is large. Once the job is complete, gaps and lifting may occur due to the metal and timber expanding and contracting at different rates naturally. The bigger the job the bigger the movement. A neat trick to mechanically anchor the solder to the job is to put small copper screws or nails in the base of the cutout or press copper wire into cracks, brush with a little flux to allow solder to permanently bond then continue filling. Pouring melted solder from a metal or alloy cup can also reduce or completely eliminate any voids and if cooled imediatly, reduce the risk of burning the timber. I hope this helps. It’s quite enjoyable and the results are often stunning especially in a dark color burl, if you have the patience.